Time Trial and Triathlon Bike Fitting
What defines a TT or Triathlon Bike?
At higher cycling speeds, mechanical efficiency and tyre rolling resistance reduce in significance and aerodynamic drag provides by far the greatest impediment to forward progress. Of the overall aerodynamic drag, the bike itself is relevant, but the rider is a far greater proportion of the total. This helps to separate the definition of a TT / Tri bike from the growing presence of 'Aero' road bikes. The latter will be designed to reduce the aerodynamic drag of the bike itself, whereas a TT / Tri bike will do this as well, but primarily look to improve the position of the rider.
Aerodynamic Drag
Aerodynamic drag of any shape is a function of its drag coefficient (Cd) and frontal cross sectional area(A). A racing cyclist in a crouch position will have a Cd of around 0.9, which does not sound very good but is at least better than if they were just standing up (1.20) or a flat plate (1.17). To improve our aerodynamics (CdA) we need to improve both Cd and A. Many people can envisage how air molecules will impinge onto the front surface of any moving body, increasing pressure and so creating drag. What can be more important though is flow separation causing a reduction in pressure behind the object. Aerodynamicists will attempt to prevent this by maintaining laminar flow around the object for as long as possible, avoiding sudden changes in shape. This gives the classic aerofoil section (such as an airship) that has a Cd of 0.02. As a rough guide any 'streamlined' shapes need to have a chord ratio (width to length) of approx. 1:4 to be effective (1:2 is only marginally better than a round tube). This is not particularly easy on a bike, but we can see plenty of examples such as aero helmets, frame shapes, aerobars, spokes and deep rim or disc wheels.
For more details and opportunities for testing your aerodynamic performance, have a look at our new section including:-
Basic Aerodynamics
Cycling Aerodynamics
Aerodynamic Testing
Forwards and up?
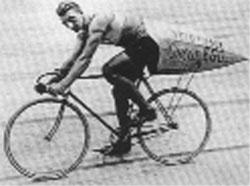
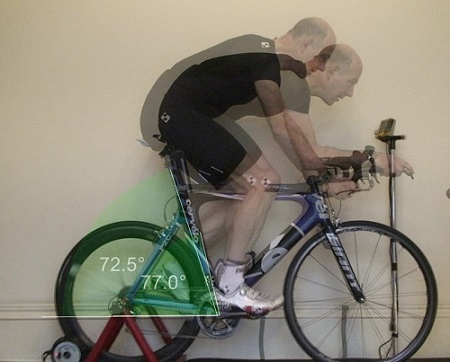
A TT / Tri bike essentially rolls the rider forwards as if there was a pin through the bottom bracket. This reduces the frontal area and improves the chord ratio of the torso, hopefully improving both Cd and A. In the photo on the left, we can see an overlay of the same rider (on the drops) on his road and TT bikes. The datum point is the bottom bracket of each bike and we can see how he is much lower, with a flatter back on the TT bike. It is not just a question of being lower at the front though, as the saddle is much further forwards as well.
Muscle Groups and Gravity
Some people believe that a typical Time Trial position uses very different muscle groups to conventional cycling. This may be true of the arm and shoulder muscles but if you were to compare the key anatomical angles of a road cyclist in an aggressive 'on the drops' position with those of a TT posture they are very similar. Both of these positions rotate the pelvis forward to stretch the Glutes and Hamstrings into a more effective region. This will be at the expense of the hip flexors which are shortened but the overall benefit is positive. Both of these positions are constrained by how far forwards the torso can be inclined as eventually the minimum hip angle reduces to a point where power delivery is adversely compromised.
The body's position relative to itself matters in terms of power delivery, but its relationship with gravity is also important. Given the aerodynamic benefit of the rolled forwards TT bike position, why don't we ride like this all the time? In Saddle Fore-Aft we show how the most suitable position is when the rider is well balanced, without too much weight on their hands.
The problem with the forwards saddle position of the TT bike is that significantly more weight is now carried on the arms, with the potential to cause discomfort to hands, arms, neck and shoulders. The TT bike solves this problem by providing elbows pads, transferring loads directly into your shoulders. These also have the aerodynamic benefits of bringing the elbows in and providing for horizontal fore-arms. To summarise, a TT / Tri bike can be defined as a relatively forwards saddle position, permitting a low upper body, flat(ish) back and with the means to take your upper body weight on elbow pads.
Achieving a good position?
So how do we establish a good TT / Tri position? The first question that needs to be asked is the duration and type of the event as a 5 or 10 mile time trial is a very different proposition to an Ironman. Over shorter TT events we can sacrifice comfort over speed, with no requirement to run off the bike.
In simple terms a good TT / Tri position can be achieved by paying attention to three key factors.
- Minimum Hip Angle
- Saddle Height
- Frontal Area
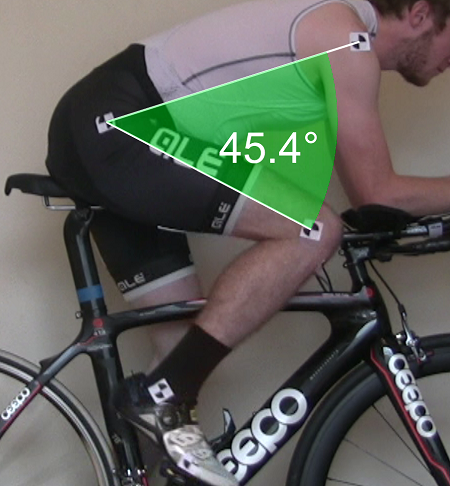
Minimum Hip Angle
An appropriate minimum Hip Angle will be defined by the event type, duration and riders flexibility. In simple terms it can be described as how close your knees come towards your chest. Too close and you will lose power, too open will compromise aerodynamics. The mechanisms by which power is lost are usually due to constrictions on the ability to breath, lack of flexibility and stomachs getting in the way. More seriously, blood occlusion, i.e. compromised flow due to artery compression or kinking can be dangerous. To simplify hip angle measurements, we can use body reference positions at the knee, Greater Trochanter and shoulder. The problem with this is that it assumes a straight spine, which is rarely the case, so the actual hip angle is usually higher. Even so, the measured hip angle is still a valid metric and a suitable angle for an Ironman competitor with average flexibility would be around 50°. A good angle for shorter events would be closer to 45° and the best sustainable angles I've ever seen are around 40°. These people are highly flexible freaks though! We also need to consider the ability of the neck muscles to hold the forward head position as this could be the limiting factor on the height of the front end of the bike.
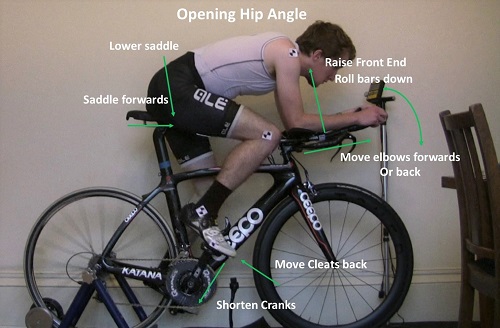
How to Change Hip Angles.
Fore-Aft Location.
Sitting further forwards or backwards will open up or tighten the hip angle respectively. On a road bike, the riders fore-aft location is largely defined by the saddle position. This is not always the case on a TT / Tri bike. Often the rider will need to increase their hip angle to improve comfort or minimise power losses and move forwards to the tip of the saddle. I've also seen cases where a rider's fore-aft location is defined by their elbow pads and shoulder posture, with saddle location changes making little or no difference whatsoever.
Aero Bar height.
Raising or lowering the front end of the bike is the next biggest factor, with higher bars increasing hip angles but also compromising aerodynamics. Depending upon the angles of the upper arms to the vertical, moving the elbow pads fore or aft can also change the effective height of the bars. Similarly, tilting the aero bar extensions up or down can drop or lift the elbow pads.
Saddle Height.
In simple terms, increasing the saddle height will tend to tighten the hip angle, whereas lowering it opens it up. This is not always the case though as the height of the saddle can define where you sit on it (a high saddle will tend to push you forwards).
Crank length.
Reducing crank length will lower the rising knee and reduce hip angle. Cranks lengths can shorten considerably before causing any significant power loss.
Cleat position.
Moving the cleats back will mean there is less 'foot' to get over the top of the stroke with a commensurate lower knee, larger hip angle.
Ankle Posture.
Keeping your heels down as the foot passes forwards over the top will lower the knee and open the hip. We may not be able to actively dorsiflex the ankle, but we can ensure that the shoes are not impeding the ability of the ankles to flex.
Saddle Height
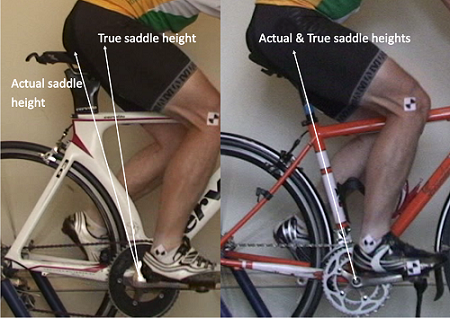
Just as with a road bike position, saddle height is absolutely key to achieving a powerful, comfortable TT / Tri bike position. Many cyclists will have found their saddle height 'sweet spot', which for some people can be a very narrow window with problems if just 1-2mm higher or lower. This will be the same on a TT bike, with the added complication that the effective saddle height will change considerably if sitting on the nose of the saddle compared to the 'neutral' position. The standard road bike saddle height measurement is from the centre of the bottom bracket, along the seat-tube axis to where this intersects with the top of the saddle. The rider should be sitting in the saddle 'neutral' position and for most people, their Greater Trochanter will be close to the same axis. On a TT/ Tri bike, the effective or 'true' saddle height is along the same axis from Bottom Bracket to Greater Trochanter, but this could be 0-30mm different from the 'actual' measurement along the seat tube axis. As a start point, the 'true' TT/ Tri bike saddle height should be similar or 1-2mm lower than the same rider's road bike. It might need to be lower due to our hamstrings, which due to their attachment points on the pelvis and below the knees set an upper limit on how much the pelvis can roll forwards, dependent upon the flex at the knee. Essentially, the straighter the leg, the less able the pelvis is to roll forwards. You can test this yourselves by trying to touch your toes with straight legs, then slightly softening the knee joint. An alternative view suggests that the saddle height should be as high as comfort permits as this will flatten the back and improve aerodynamics. This is probabaly the case and may be acceptable on short events, but the loss of power due to an incorrect saddle height may not be ameliorated by the reduced drag.
Frontal Area
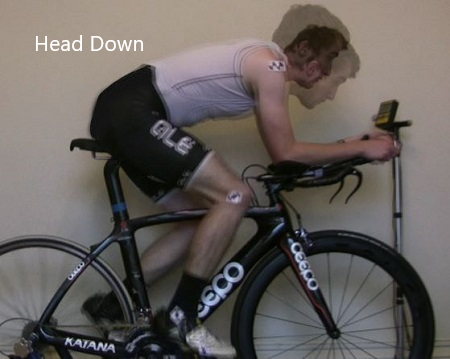
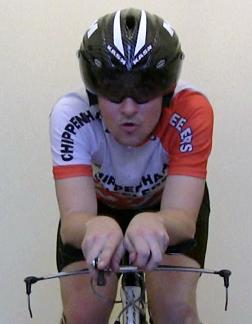
There are numerous recommendations for the locations of hands, elbows, shoulders and heads on TT / Tri bikes e.g. ears vertically above elbows, upper arms at 90-100° to torsos, forearms horizontal etc. Essentially they are all trying to do the same thing, which is to make the cross sectional area when viewed from the front as small as possible, whilst being comfortable enough to sustain the position for the duration of the event. Obviously, Minimum Hip Angle and frontal area are closely related, but there are circumstances where raising the front end of the bike or the width of the elbow pads can actually improve the frontal area. This is because the best means to reduce our frontal areas is often to get our heads hunched down between narrowed shoulder blades. Straining the shoulders down because the pads are too low or having the elbows too close together can stop the head achieving a sustainable low position with suitable visibility.
Basic Rules of Thumb to minimise aerodynamic drag are as follows.
Position the pad width such that the elbows are just inboard of the thighs.
Ideally extension bars will be a hockey stick type with a single bend as these help to anchor the fore-aft location and prevent unnecessary wrist strain.
The extension bars will place the hands such that the elbows are just behind the pads. You want the pads to be supports, not pivots.
Roll the shoulders forwards and hunch the head down between the blades.
Lower the front end of the bike as much as you can without significantly compromising power generation, breathing and the ability to keep your head down.
Ensure there is space between the knees and arms.
If you desperately want to sit up well before the race is over, the minimum hip angle is probably too tight or saddle too high.
The saddle height and minimum hip angles are connected. An optimum saddle height may change as the hip angle is altered.
Wear tight flap free clothing.
Minimise external cabling.
